Friday, September 30, 2011

Three Cards In One Day!

I made three cards today --- and they are all going to the same address!


First, for my niece-in-law, Anita, a birthday card ---- a very special one!  You see, last year I forgot her birthday, which was unforgivable because her birthday is the same day as mine!  

 I chose the image "Take Me Away" by Tiddly Inks.in hopes that Anita can get a few quiet moments on her birthday, even if it is just by looking at the card.  She is the mother of two little children and runs a daycare center.  She is one of the most patient and organized people I know!  The paper is all from the Basic Grey Wisteria collection, except for the metallic blue for the background.  I added lots of bling, lattice lace and a fabric flower by Prima. 

 The image is colored with Copics and the bubbles are spattered with light blue Stickles. 

-----------------------

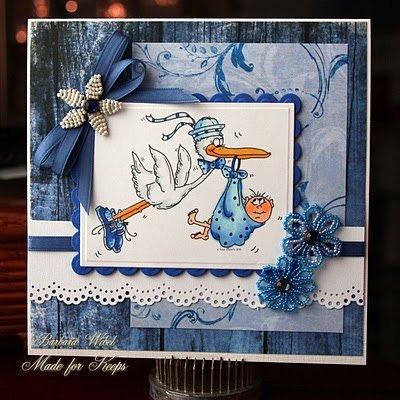
The second card is for Anita and Alan, my nephew.... and their new baby boy Cohen who was born in July. I haven't met my new little grand-nephew yet, but I will next weekend.  I love holding new babies!

 The image is a Sassy Cheryl digistamp .  I used a variety of patterned papers from my stash, keeping everything in the traditional boy blue.  Besides I like blue!  The white border is Martha Stewart lace punch and the beaded flowers were in the clearance bin at Michael's.  

 The image is colored with Copics, but on paper that I won't use again for Copics.  It bled too easily, especially with the darker colors. 

------------------------

The third card is for my grand-niece, Sienna.  She is Alan and Anita's four year old daughter and Cohen's big sister.  I made this card to make her feel good about being a big sister. She is actually doing great, and has started pre-school so she's feeling like quite a big girl.   

  Inside is a little note to her about being Cohen's big sister like I am her grandpa's big sister and that she will be a terrific big sister. I used Mo Manning's image "Helena and Henry". The card is made from more scraps  from my stash and distressed for texture.  The flowers are mulberry paper flowers and I haven't a clue where I got them.  Those and the center brads are things I've had for ages! The pearls are new, though, from Michael's Recollections.

I colored the image with Copics, of course.  I love this image! I forgot to mention in the other descriptions, but all of the die cuts are Nestabilities.  

All of the cards are neatly packaged and ready to go out priority mail tomorrow.  I'm not missing Anita's birthday this year!!

Thanks for stopping by today!  It is getting quite late so I'll say goodnight and sweet dreams.  Have a wonderful weekend, everyone!

Bah! Humbug! Challenge 38 --- Nativity

This is my last challenge as Bah! Humbug! Guest Designer.  It is so hard to give up the keys to Humbug Hall, although I was lucky to have five Fridays instead of the usual four.  These ladies are fantastic to work with, lots of fun and so gracious.  Thank you for the experience!

Now for the challenge this week --- Nativity.  My card is quite a different style for me, but when I found the clear stamp set by Inkadinkadoo I knew just what I wanted to do.

 There are several pieces to the set, but I used only four due to space limitations.  I went with the easel style card to maximize visibility of the images.  The images are stamped with Memento Tuxedo Black then highlighted with Pentel metallic gold gel pen.  

The card base is black card stock and I used gold metallic textured card stock for the next layer.  Keeping the colors and shapes simple I used layers of the gold and black cut with the Nestabilities.  The photo corners are made with the Martha Stewart punch.

I kept the look clean by not adding any embellies at all and to keep from overwhelming the simplicity of the images.

To my friends who are experts at clean and simple, tell me what you think of this.  I nearly had to put a lock on my rhinestone drawer to keep from adding bling!

Thank you for stopping by today and be sure to hop over to Bah! Humbug! to see more inspiring work from  Ann and Max and the participants.  Join in the fun!

*********************
The deadline for this challenge is 
12 noon (UK time)
Thursday 6th October 2011
 *********************
You are free to create whatever you like ... it doesn't have to be a card ... in fact, show us as many different Christmas Projects as you want to share. 

Wednesday, September 28, 2011

Phindy's Place Challenge --- Color Wheel........

........ and another birthday card.

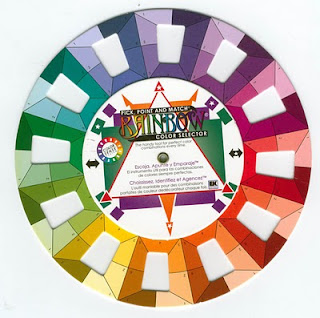
When I saw the challenge at Phindy's Place I thought it would be fun to use the color wheel and I added a bit of a twist.  I took the wheel in my hand, closed my eyes, and started turning the center circle.  The idea was that I would use the color combination that came up.  For me, not a great idea, because it couldn't have been a harder color combination for me to work up.  Especially since I had a new Phindy's image of Mrs. Comfort that I wanted to use specifically for a dear friend's birthday card.  

First, the color wheel as it landed...........
 My mission was to make a card using yellow orange and purple.  My two least favorite colors.  But I wanted to make a birthday card with this new image, and I hope my friend likes how it turned out.
P.S.:  My friend, Peggy, who I can now reveal is the recipient of this card, asked about the color wheel.  I realized it is not clear with this scanned image where I was actually looking to get my color combo.  There are two little triangles with stars in them and they are opposites on the color wheel.  Actually, I could have used the little black arrows, too, but I didn't see those till I just now read the directions on how to use this thing!  I don't remember where I bought this but it is by EK Success and comes with detailed instructions.  It's like a slide rule for colors! It is one of those Oldie But Goodies things that I don't use often --- but SHOULD!  

After coloring the image the real challenge was finding paper in my stash to make the card.  I have a bad habit of coloring the images then matching the papers.  That can be tricky at times!  I should know better by now!

The image is colored with Copics.  The chair and the robe are done in the colors from the wheel, or pretty close.  The knitting project is in red as that is a pretty good third color for the combo.  

I included a photo of the inside to show the accessory image, the yard skein and balls, which I almost forgot to place in the card!  I don't remember where I found the sentiment, but I keep it in my favorites.

I think this card turned out ok.  One thing is for sure -- it is filled with lots of happy birthday wishes, big hugs, and a lot of love for being such a caring and inspiring friend!  Happy Birthday, PM aka WA!

Tuesday, September 27, 2011

While I Prepare Another Card for Posting.........

Besides making cards and taking photos I have another favorite activity that I haven't indulged in for several years.  That is until the past few months.  Here's a teaser..................


For more details you can read about it on my other blog "Hampton Road Photography".  Now, back to work on more birthday cards..................

Monday, September 26, 2011

A Birthday Card for a Special Lady

This time of year brings lots of birthdays in my little corner of the world, so this weekend I've been working on several cards for these occasions.  Some are done and ready to mail so I thought I would share one of them with you today.  The special lady who will be receiving this won't see it for a few days, but since there are a few I'll just keep them all guessing.

There is no stamping on this card, but three different Nestabilities die cuts were used (one is cut in half and placed on the sides) and a butterfly punch. All of the papers are from the DCWV Mariposa stack.  That is one of my favorite dp stacks and I just want to horde it!  That's part of my problem, papers are so gorgeous I hate to part with them.  But it really is much more fun to share them in cards with people we love!
The image is from my collection of vintage postcards and greeting cards.  Some of them come from generous ladies who share their antique treasures on their blogs.  This is one that was shared by Bumble Button.  It's hard to see in the photo but I coated the image with crackle for more vintage feel.  This is such a beautiful image, the flowing sheer overlay on the dress and the lovely movement portrayed --- and those teeny tiny feet!!
Sideways view shows the double layers of the butterflies, the top being gold-flecked vellum that will pop up once the card is opened.  Otherwise I kept the card quite flat for mailing.
The sketch I used is from the magazine "Card Ideas for Paper Crafters".  I think it is still on the shelves, but it is full of great sketches, each with several cards made to show the versatility.  I often start with a sketch but end up with something quite different, though this time I stuck pretty much to plan.

Well, I've been writing this post between errands and phone calls, now I have to go pick up my freshly groomed dogs.  Thanks for stopping by! More birthday cards to come!

Friday, September 23, 2011

Bah! Humbug! Challenge38 --- Reindeer or Rudolph

It's already my fourth week as guest designer for Bah! Humbug! and I am having so much fun at Humbug Hall, especially since the spiders have been eradicated.  This week we are celebrating a much cuter critter --- reindeer or Rudolph.

I had fun using nearly all new materials for this card.  The papers are from the Recollections Love Letters and the reindeer stamp is part of a new Christmas set also from Recollections, the Michael's brand. The reindeer ribbon is new at Michael's for the Christmas season. The glitter flowers, center brass brad, and red rhinestones are from my stash.  The reindeer (isn't he cuuuuute?) is heat embossed with red embossing powder.  Easy-peasy!  He is stamped on one of the papers from the collection and matches the card base. The red patterned paper is all glittery.  All of the papers in this stack are Kraft based, so the larger Nesties die cut is actually the back side of a leftover piece.  

Close up of the bow ensemble.  Love the woven ribbon!

The card measures 5 X 7 in all so easily fits in that sized envelope.  Lots of room on the inside for personal notes and even a reprise of the reindeer stamp.

Just a little side note:  These aren't reindeer, just regular deer, but they are frequent visitors to my backyard.  It's unusual to see them in the daytime, though this was fairly early in the morning.  There are two mamas and two babies, and very likely a couple of bucks in the trees.  They usually come out at dusk, or after dark, and head to a nearby pond.  I can tell they are there because my dogs go crazy barking at them.  The backyard is pitch black unless the moon is bright so they are nearly impossible to see, and incredibly quiet. 

Now, back to the Bah! Humbug! Challenge.  

 *********************

The deadline for this challenge is 
12 noon (UK time)
(1:00 am US CDT)
Thursday 29th September 2011
 *********************
You are free to create whatever you like...it doesn't have to be a card.  In fact, show us as many different Christmas Projects as you want to share.  I am so enjoying looking at everyone's projects this month (and added many new favorite bloggers to my reader, too). We are quite sure that we will be seeing lots and lots of wonderful reindeer!  Hmmm, I wonder how many will have red noses??

Thanks for stopping by --- now, get busy!!  ;-)

Wednesday, September 21, 2011

Design D.I.V.A.S. Oldies But Goodies Blog Hop


Today is the 3rd Wednesday of the month and that means another Design D.I.V.A.S. Oldies But Goodies 
BLOG HOP!  
 This is when we use neglected and forgotten items from our stashes.  The Design D.I.V.A.S. is a private Facebook group, which is a branch of the Original Design D.I.V.A.S. on the Splitcoaststampers website. The acronym for the D.I.V.A.S is, Divine, Inspirational, Virtuous, Artistic (or annointed) Sistahs. This is a very talented and supportive group, which I'm blessed to be a part of . 

 If you came here from the multi-talented Cindy's blog you are on the right track.  She is a tough act to follow and I am honored to be in her company! To start at the beginning of the hop pop on over to see what our amazing and sweet Carolyn has put together.


Recently I was sorting through dusty boxes and came across 3D Memory Keepers from Deja View.  I think I got these for scrapbook pages to hold trinkets, coins, and other keepsakes.  Since they are in two pieces and seal rather tightly they hold the FloraCraft Diamond Dust quite well, too.  So, inside I used these adorable little penquin foam stickers with just enough "snow" for them to dance in. 


Even the penquin paper is obg, since I haven't used it since last year's Christmas cardmaking. Along the top I added red trim shaped with Martha Stewart border punch.  Dangling from the scallops are little stick-on snow balls.  I use lots of these during the season!


Here is a close-up of the happy penguins.  They make me think of the adorable movie "Happy Feet".

It's been a fabulous blog hop so far, right?  There are actually more stops!  Hop on over to Dru's where you will surely be delighted by her gorgeous creations!  Thanks for stopping by today!

Tuesday, September 20, 2011

CAS Sympathy Card

Yesterday I posted a couple of the six cards I made.  This is one of the others. It is clean and simple, which for me isn't all that simple, but I do like the way it turned out. 


The design of this card has been in my head for literally months.  I saw one similar to it in one of the many card magazines I look at.  The feathers were what touched my heart.  I had found out, quite by accident, that a man who was very special in my life (during my single days) had passed away.  Though I had not had contact with him for about 17 years, this news hit me hard and it has been difficult to express my sympathy to his daughter.  The feathers are significant because every card he ever sent me contained a feather of a wild bird that he picked up in the woods when he hiked.  This stamp is from Inkadinkadoo.  I stamped one image with Jet Black Memento, then masked it and stamped two more images with London Fog Memento without re-inking.  The sentiment is computer generated and was done before the stamps.  The scored lines along the left and bottom don't show well here, but help to balance the off-center placement of the top layer.  I think I am ready to finally let go and send this card.  And, yes, there will be a feather inside.

Monday, September 19, 2011

Busy Day In the Studio

While sipping my morning coffee, I made a list of cards I need to make, not just for challenges but personally. I was stunned at how long the list became.  So I got busy in the studio and now I have six cards done!  I was able to get pictures of only a couple of them before the natural light faded, though.  


 The first one is a quick "Thank You" note that my step-dad needed to give someone who volunteered to do an enormous amount of "DVD burning" for the office. It is simple yellow cardstock embossed with Stampin' Up Vintage Wallpaper embossing folder.  The image is from a collection of vintage art that I found in free downloads.  A couple of Martha Stewart daisies and a sentiment tag was all it took to finish it. 

This sympathy card is for family friends who recently lost their father/father-in-law.  Mom and I will both be sending cards and this is the one I made for Mom to give them.  Again using vintage art I matched up scrapbook paper I've had in my stash forever, then added a pearl swirl. 

I have another sympathy card to send them, but the photo I took just didn't do it justice so I will post it later.  I actually made two sympathy cards nearly alike.  Kind of depressing, making so many sympathy cards in one day.  On a more cheerful note, I did get my card done for the Bah! Humbug! challenge that will be posted on Friday.  This Wednesday is the Design D.I.V.A.S.  Oldies But Goodies blog hop and I have that card ready, too!  So, all in all, it was a very productive day.  Believe it or not, I still have three birthday cards to make and a few challenges that I want to participate in.  Looks like tomorrow will be a busy day, too!

Thanks for stopping by! I hope you have a wonderful week!


Sunday, September 18, 2011

Mo's DP2 Challenge #100 -- Let's Celebrate!

Congratulations to Mo Manning's DP2 100th Challenge!  Time for a celebration and that is the theme this week.
.

The March Hare found this to be a great time for a party so he got out his best party clothes and gold tea set  to celebrate this 100th challenge.  This was a pretty easy card to put together, using the Nestibilities die for the image and background. The buckle accents a piece of silver and black glitter ribbon, or more accurately the other way around.  The ribbon is really pretty but doesn't show much here.  Don't worry, it will show up on another card for sure!  The square stickons in the corners look like zebra skin but blend well with the other patterns.


Close up you might see the glitter on the tea set and everything else is colored with Copics. 

  The inside of the card has more of the dp and a blank white space for a personal note.  

There is a big party going on over at Mo's challenge!  Wait till you see what the DT put together!! Wowza!  Better get on over there and take a look! 

Saturday, September 17, 2011

Sassy Cheryl Challenge -- Something Good to Eat!

Today is cold and rainy -- brrrr!  A perfect day for a frothy latte or a hot cocoa topped with whipped cream. This fits in well with Sassy Cheryl's challenge this week - Show Us Something Good to Eat! 


 It isn't quite cold enough for snow, but Cheryl's Snowmen are always welcome here, especially when serving up a luscious latte!  I used fun dp from the DCWV Belle Cafe stack, one of my favorites.  The lovely die cut, that is nearly all hidden is actually from the Cricut cartridge "Elegant Edges".  I just bought this cartridge (on sale at Michael's for $29.99 -- saved $60!! Woo Hoo!)  I have a feeling the cartridge will get quite a work out!  Loads of designs that can be frames, elongated, and even borders. The bow is from ribbon edged organza and I learned the double bow technique from Jak Heath's tutorial.  She is always generously sharing her skills and creativity.  This was actually very simple! 


 I colored the image with Copics and used Liquid Pearls for the froth on the latte and the top of his hat. 

Inside is a plain yellow space for a personal note and a scrap of the dp for a border.  The swirl at the top is the cut out from the die cut on the front of the card.  I'm trying to get into the habit of doing the inside of the cards with scraps as I go along.  It's so tempting to just finish the front but the inside can be just as fun!

I also want to give credit for the sketch to The Deconstructed Sketch and will enter this card in their challenge as well.

Thanks for stopping by today.  I hope you are enjoying your weekend, whether it is cold and rainy or warm and sunny. 

Friday, September 16, 2011

Bah! Humbug! Challenge --- Flourishes and Swirls

Flourishes and swirls and dizzyingly creative projects.... that is the theme at Bah! Humbug! this week.  Who doesn't love beautiful soft swirls and flourishes?  They add motion to a project and, in the card I made, lots of motion! 

I started with patterned paper from a stack I've had on hand for years! It is Slab XI by Provocraft and has a variety of swirling patterns in several color combos.  This piece was perfect for the image, which I had already colored.  This adorable image is Teen Fairy Pia, new at Mo's Digital Pencil.  She is colored with Copics (yep, I actually remembered to write down the numbers!):
Hair -- W00, W1, W3
Skin -- E00 and E000
Dress and wings: -- R20, R22, R27, R29, R11, R00, YG61, YG67


The card base is pink Bazzill card stock, which I also used for the pink and green swirls. These were cut on the Cricut using the Home Decor cartridge.  More green Bazzill die cut with my Nesties backs up the image also cut with the Nesties. The poinsettias are Recollections by Michael's.  A fairy this magical deserves some sparkly pixie dust so I added the rhinestones to the swirls.

Here us a close up of Pia.  She has a sister named Mia, too!

Now it's your turn to put your creativity in motion with swirls and flourishes!  Remember, you don't have to make a card.  Any Christmas project will do!  And the more the merrier!
  
The deadline for this challenge is 
12 noon (UK time)
Thursday 22th September 2011


If you like my project (and even if you don't -- heehee) hop over to Bah! Humbug! for inspiration from the DT and the participants.  You'll be swirling with excitement!  Ok, now I'm getting dizzy.

Monday, September 12, 2011

Mo's Digital Pencil Challenge #99 --- Boy Attitude

Ok, girls.... admit it. "Boy attitude" in the form of

tall
dark
and
sultry

still brings on palpitations, sweats, and hot flashes.  No, honey, that is NOT menopause.  It is


I couldn't wait to get this hunk colored and placed on a card --- or something!
He is colored with Copics so I could get deep colors and depth.  I added accent outlines here and there with Copic black multiliner 0.5 for additional sharpness.  That effect really worked for me and I see more of it in my future!


So I made a card (of course).  This is probably the most unusual card I have ever concocted, and it was A BLAST!  I let myself go with a dark, grundgy look, using papers and embellies I've had on hand for a very long time.  The patterned papers came from Paper Pizzazz collections.  Brown and black Bazzill card stock for the card base and backgrounds.  I have several pieces of the suede cording from other projects and the bar brads are from Karen Foster Designs.  It took a long time before just the right project came along for the bar brads. The stick-on square and round brads are K & Co. The image is cut with Nesties diamond dies and placed askew (love that word -- askew).  There is just enough dark grey chalk rubbed on to dirty up the white space.


Inside the card are more of the asymetrical shapes mirroring the front of the card.  The image comes with a great sentiment, but I opted for this one, as it better suited the purpose for this card.  The black card stock is embossed with the Tim Holtz  brick embossing folder.  A close up of the photo will show that.

Like I said, I had a blast putting this card together!  It's sort of like the rare times that, as a little girl, I chose to make mud pies outside rather than bake cookies in the kitchen.  Now, I still don't like to get my hands dirty, and I rarely bake cookies, but letting my imagination get a little "dirty" at times is as much fun as, well, mudpies! 

Thanks for stopping by.  Now for more "boy attitude" hop on over to Mo's DP2 Challenge and join in on the fun. 


Sunday, September 11, 2011

Sassy Cheryl Challenge #80 -- Wrap It, Bag It, Box It!

It has been awhile since I've been able to participate in Sassy Cheryl's weekly challenge, so it is especially fun to be back for this one.  I am so used to making cards that this week's challenge -- Wrap It, Bag It, Box It --- made me think outside the box, ironically.

I do a lot of photography and often give CDs of the images to those in the pictures.  It is fun to create the CD labels.  This challenge made me think of a special CD jewel case for the photos of the spooky Halloween goblins.


The images used here are Sassy Cheryl's "A Witch and a Frog".   She is really too cute to be a wicked witch, but I'm not so sure about that frog!  This creepy tree is actually from Tiddly Inks.  I love the twisted trunk and it made the perfect background for this little scene.  The bats are cut with the Cricut  and can be found in the Paper Doll Dress Up cartridge.  The label on the side of the jewel case was computer generated.


The tree and the witch were colored with Copics.  The background is various shades of blue, lavender, yellow, and pink chalks from Stampin' Up.  I applied the chalk with Q-tips.


The whole scene was trimmed up with bat wing craft scissors and mounted on black card stock.

I really like this project, even though I don't have little goblins to take photos of.  But then, my little grandniece and grandnephews will probably cast some spooky spells on their neighbors. 

Thank you for stopping by!  For much more inspiration from the DT, hop on over to Sassy Cheryl's Challenge.  You won't be disappointed!

Friday, September 9, 2011

Bah! Humbug! Challenge 36 --- Paper Weaving

Yet again the ladies at Bah! Humbug! present an opportunity to stretch our creativity! The theme this week is "Paper Piecing" so I chose Iris Folding as my interpretation.  This technique has been around for a long time but I just never sat down to tackle it until now. 


It's kind of risky to try a new technique while I am honored to be the Guest Designer at Humbug Hall this month.  I'm hoping that this first attempt doesn't land me in the moat!  Actually, no worries there.  Ann and Max are the most gracious crafters and LOVE to see everyone's creativity. So, jump on in --- not into the moat! --- and try out your paper weaving technique! You will definitely be rewarded with comments and kudos! Just leave a comment at Bah! Humbug! with a link to your post
.
The deadline for this challenge is
12 noon (UK time)
Thursday 15th September 2011
We'll be around to visit and soak in all the inspiration from your projects!  Have a wonderful week and --- HAPPY CRAFTING! 

Monday, September 5, 2011

For My Aunt's 90th Birthday

On September 7, 1921, Lorraine Quinn was born in South Dakota.  Ninety years later she just recently celebrated 70 years of marriage with my uncle, Earl Anderson and the 55th birthday of their son Larry.  In two days my mom and I will be in Iowa to celebrate the 90 years of this wonderful lady's life.  She has been like a second mother to me so I often call her Aunt Mom. 

I wanted a very special card for her, something vintage and loaded with beautiful things.  Lorraine is probably my biggest fan when it comes to my cards and often keeps them sitting out for months.  I hope this one sits out for many more years to come.


First I have to thank Louise at Bumble Button for sharing so many exquisite vintage photos and images! This image came from a Jane Austen era post she did a few months ago. Though the era is before Aunt Lorraine, this beautiful face reminds me of her as I see her in early photos.  Also, there are so many goodies on this card, many of them pieces I've had in my embellies stash for a long time.  I found the crocheted lace in an antique store. Often my cards have lots of layers and fancies, but I think this might just be over the top for me.

 I have to give credit to a very talented cardmaker for the layout and inspiration, however, I forgot to write down the blog name.  If you recognize this layout please accept my thanks for the inspiration and my apology for not giving you proper credit.  When I saw it I knew it would be perfect for this occasion.   

Thanks for letting me share this with you.

Happy birthday, Aunt Lorraine!

Friday, September 2, 2011

Bah! Humbug! Challenge --- Text or Sentiment

I am so excited! For the month of September I am a Guest Designer at Bah! Humbug!  I found this blog last year and fell in love!  They have so many fun and inspiring challenges every week.  I found Max, Ann and Irene to be very special --- and funny --- ladies who I would love meet for a cup of coffee -- or tea!  

This week the challenge is "Text or Sentiment".   I always admire cards that use a sentiment as the focal point so this challenge gave me the opportunity to make one for Christmas.  The simplicity of computer generated sentiments will make this a favorite for the coming holiday season.  


This card has a lot of bling, too.  The background is a beautiful aqua glitter paper.  I used two sizes of the Nestabilities Curved Rectangles in aqua card stock and a pretty snowflake dp.  The sentiment is cut out with the Nestabilities Labels 4.  The bling behind the sentiment are curved rhinestone stickons and glittered stems from a floral arrangement.  The bling on the sentiment is part of a stickon flourish.  I like how it turned out and hope you do, too. 

Now, it is time for you to showcase one of your favorite sentiments, verses, or other text.  It doesn't have to be a card.  In fact, we love to see all sorts of projects!  And we'd like you to put your link in a comment over at Bah! Humbug!  

The deadline for this challenge is 
12 noon (UK time)
Thursday 8th September 2011

I'll be around all week to see your creations and I am looking forward to every single one!